

Beginner's Battery-Powered Soldering Iron Kit
Battery Soldering Kit: Your Easy Guide to Getting Started
Do you need to make a quick repair? Or learn how to solder?
This battery-powered soldering kit is perfect for you. You can take it anywhere, it's easy to use, and has everything you need. It's the right choice for beginners and hobbyists. With this affordable battery-powered soldering iron, soldering is simple and fast.
Why This Kit is the Ideal Choice
Wireless Freedom
Forget about cables and outlets. This soldering iron works with 3 AA batteries (not included). It gives you maximum freedom to work wherever you want.
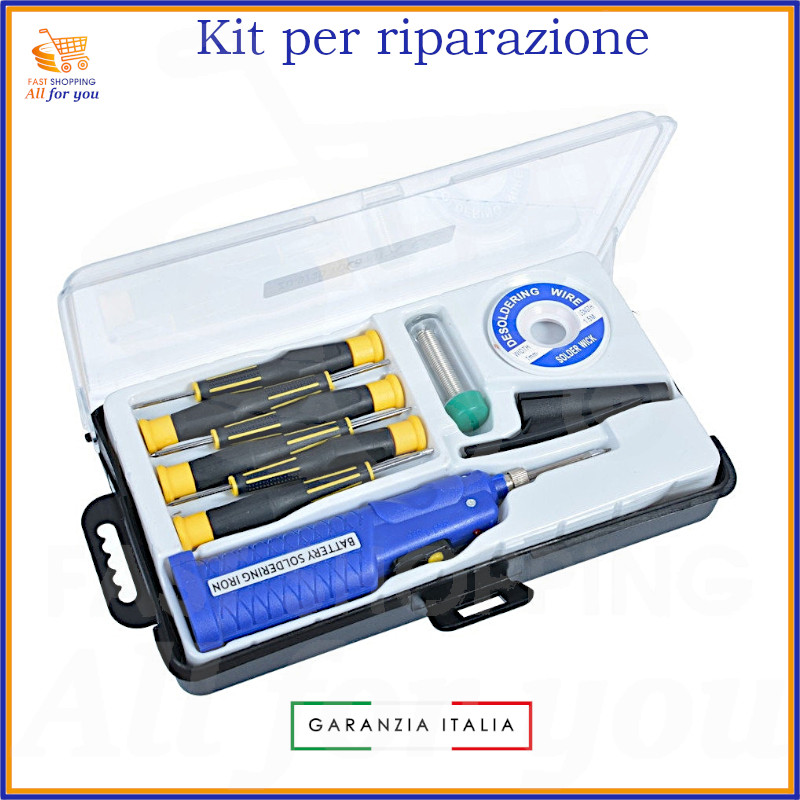
All-Inclusive
You don't need to buy anything else. The convenient case contains:
- 8W Battery Soldering Iron: Powerful and versatile. Heats up quickly. Ideal for small jobs.
- Desoldering Braid: Helps you clean up excess solder.
- Soldering Wire: Already included in the kit. You can start soldering right away.
- Screwdriver Set: With 6 pieces, useful for disassembling and repairing.

Easy to Use
This kit is designed for beginners. Its tools are simple to use. Learning to solder has never been easier.
Step-by-Step Guide: How to Use Your Soldering Kit
Learning to solder is not difficult. Follow these simple steps for your first project.
1. Prepare Your Workspace
Find a stable and well-lit table. Always work in a well-ventilated area to avoid inhaling solder fumes. Place the soldering iron stand near you, so it's easy to put it down.
2. Prepare the Soldering Iron
Insert the 3 AA batteries into the soldering iron. Once turned on, the soldering iron heats up in a few seconds. The tip will become very hot, so never touch it!
3. Start Soldering
To join two wires or a component, hold the soldering iron and touch the point where you want to solder. Let it heat for 2-3 seconds, then touch the point with the solder. The solder will melt and join the pieces. Remove the soldering iron and solder, then let it cool.
Simple Ideas for Your First Projects
Don't know where to start? Here are two easy ideas you can do with your kit:
- Repair a Broken Cable: Remove the old solder and join the inner wires of the cable, then re-solder them.
- Solder an LED: Try soldering a small LED to a resistor. It's a simple project that will immediately show you how it works.

Safety and Maintenance Tips
To use the soldering iron safely and make it last longer:
- Safety: Never touch the hot tip of the soldering iron. Always place it on its stand. Be careful of the fumes that form; work in a ventilated area.
- Maintenance: Clean the soldering iron tip after each use. You can use a damp sponge or a dry cleaner to remove solder residue.
Frequently Asked Questions (FAQ)
Q: How long do the batteries last?
A: The duration depends on usage. On average, a set of batteries can last for a couple of hours of continuous soldering. We recommend using rechargeable batteries.
Q: Can I use another type of solder?
A: Yes, you can use any soldering wire. We recommend choosing a thin one, which is easy for beginners to use.
Q: What is desoldering braid for?
A: It's used to remove excess solder. You place it on the spot to be cleaned and heat it with the soldering iron. It will absorb the molten solder, leaving the spot clean.
Start Working on Your Projects Today
With this soldering kit for beginners, you'll have a perfect ally. It's the bridge between your idea and its creation.